
Project archive guide. Technical instructions are awaiting hardware-team review; consult the documentation for your exact equipment.
Flight Controllers
The flight controller (FC) is the brain of your FPV drone. It takes data from sensors, your radio receiver, and other components, then decides how to adjust the motors to keep your drone flying smoothly. Understanding the different ports and connections on your FC can help you wire your quad correctly and unlock advanced features.
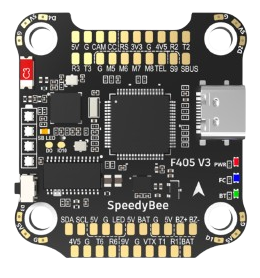
Key Ports to Know
UART
Serial communication ports used for devices like receivers, GPS, VTX control, and telemetry.
Motor Outputs
Signal pads that connect the FC to the ESCs, controlling each motor individually.
Receiver Input
Port for connecting your radio receiver so the FC can get your control inputs.
Camera Input / VTX Output
Video signal in from the FPV camera and out to the video transmitter.
Battery Pads
Main power input for the FC, often also powering other components via the BEC.
USB Port
Used for connecting the FC to your computer for firmware updates and configuration.
UART Ports
UART (Universal Asynchronous Receiver/Transmitter) ports are communication lines your flight controller uses to talk to other devices. Each UART has two pads: TX (transmit) and RX (receive), and they must be connected in reverse to the device (TX → RX, RX → TX). You can assign each UART in Betaflight to specific functions like GPS navigation, SmartAudio (VTX control), or telemetry feedback. Why it matters: If you run out of free UARTs, you can’t add more devices without removing or reassigning others. Changing assignments in software can unlock new features or fix setup conflicts.
Motor Outputs
These pads send throttle commands from your FC to each ESC, telling each motor exactly how fast to spin. The order of wiring is critical — swapping two motors will make your drone flip or spin uncontrollably. Why it matters: Correct motor order is required for the drone’s stabilization algorithms to work. Fixing mistakes can be done either by rewiring physically or by remapping motors in Betaflight without touching a soldering iron.
Receiver Input
This is where your radio receiver plugs in so your FC can understand your stick movements. It might use protocols like SBUS, CRSF (Crossfire), or ELRS, and sometimes needs power from 5V or 3.3V pads. Why it matters: If the receiver isn’t wired to the correct UART or voltage, your drone won’t respond to controls. Tip: Always check both the signal type and voltage requirements before connecting.
Camera Input / VTX Output
The FC takes video from your FPV camera (video-in pad) and sends it to the VTX (video-out pad), often adding OSD data like battery voltage or GPS position. Why it matters: Incorrect wiring can give you a black or distorted image in your goggles. Changing settings in the OSD tab lets you choose what data is displayed on your video feed.
USB Port
The USB port connects your FC to your computer for firmware flashing, PID tuning, and resource mapping in Betaflight. Why it matters: Without a working USB port, configuration becomes much harder, requiring wireless adapters or special flashing tools. Be gentle when plugging in cables — damaged USB pads are a common beginner mistake.
Port Deep Dive
Understanding UART Assignments
Each UART is like its own conversation channel between your FC and another device. They’re numbered (UART1, UART2, UART3…) and you choose in Betaflight what each one talks to. Every UART has two pads — TX (send) and RX (receive) — that must be crossed over with the device you’re connecting. COM Port: When you plug your drone into your computer, your FC shows up as a COM port — this is the “pipe” Betaflight uses to talk to it. Tip: If Betaflight can’t connect, double-check you’ve selected the right COM port and that no other software is using it.
Extra Motor Channels (M5, M6, M7, M8)
Most quads only use M1–M4, but some FCs have extra motor pads for hexacopters, octocopters, or extra gadgets like camera gimbals and payload releases. These outputs can be assigned in software to anything that accepts a motor-style PWM signal. Why it matters: You could add extra lift motors, or use these channels for accessories without affecting your main flight motors.
Special Control & AUX Ports
Some flight controllers have CC (Control Channel) or CH (Channel) pads that aren’t tied to standard motor or UART functions. These can be mapped to auxiliary switches on your radio for features like lights, camera triggers, or dropping payloads. Tip: These often require setup in the “Resource Mapping” section of Betaflight’s CLI to work as intended.
Video Signal Routing
Your FC acts as a middleman between the FPV camera and VTX, letting it insert OSD data into the video signal. Knowing which pad is CAM (input) and which is VTX (output) is crucial. Format Matters: If your OSD looks glitchy or cropped, your camera and FC might be using mismatched video formats (PAL vs NTSC).
USB & Bootloader Access
The USB port isn’t just for tuning — it’s also how you flash firmware. Some FCs have a “boot” button or pads that force the board into bootloader mode for recovery flashes. Why it matters: If you ever brick your FC during a failed update, knowing how to access bootloader mode can save it from the trash bin.